How to Install Residential Water Softening Systems for Protecting Plumbing Fixtures From Hard Water Mineral Buildup
Hard water is the quiet saboteur of a home’s plumbing. You rarely see it working, but over months and years the calcium and magnesium dissolved in your tap water leave scale inside pipes, coat heating elements, spot glassware, and choke showerheads and faucet aerators until fixtures that should last decades start failing early. A water softening system stops that damage at the point where water enters the house, and installing one is a manageable project for a homeowner with basic plumbing skills — provided the system is sized correctly and the drain and electrical connections meet code.
The short answer is this: test your water first, size the softener from your hardness reading and household water use, install it on the main cold-water line before the water heater with a bypass valve and a code-compliant drain, then program the control head and run a manual regeneration. Most first-time installs take three to six hours. The rest of this guide walks through each step so your fixtures get real protection instead of a system that regenerates too often, wastes salt, or leaves water still hard.
Hard Water Is Quietly Damaging Your Fixtures
Hardness is measured in grains per gallon, usually written as gpg, and one grain equals 17.1 milligrams per litre. Water under 3 gpg is soft, water above 7 gpg is hard, and anything over 10.5 gpg is very hard. The damage is cumulative: scale narrows pipes, insulates water-heater elements so they run hotter and burn out sooner, and leaves the chalky film on taps and shower doors that no amount of wiping seems to fix. Soap also works poorly in hard water, so laundry feels stiff and skin feels filmy after a shower.
How a Salt-Based Softener Swaps Hardness for Sodium
Most residential softeners work by ion exchange. Untreated water flows through a mineral tank packed with tiny resin beads that carry a negative charge and are coated with sodium or potassium ions. Calcium and magnesium carry a stronger positive charge, so the beads attract them, trap them, and release a small amount of sodium into the water in exchange. The water leaving the tank is soft; the hardness stays behind on the resin.
When the resin is saturated, the control valve starts a regeneration cycle. It draws brine from the adjacent brine tank, flushes the resin bed with the concentrated salt solution, and forces the trapped hardness off the beads and down the drain. A full cycle runs through backwash, brine draw, and rinse stages and typically takes about ninety minutes to two hours. Demand-initiated systems use a meter to regenerate only when the resin is close to exhaustion, which saves both salt and water compared with a fixed timer.
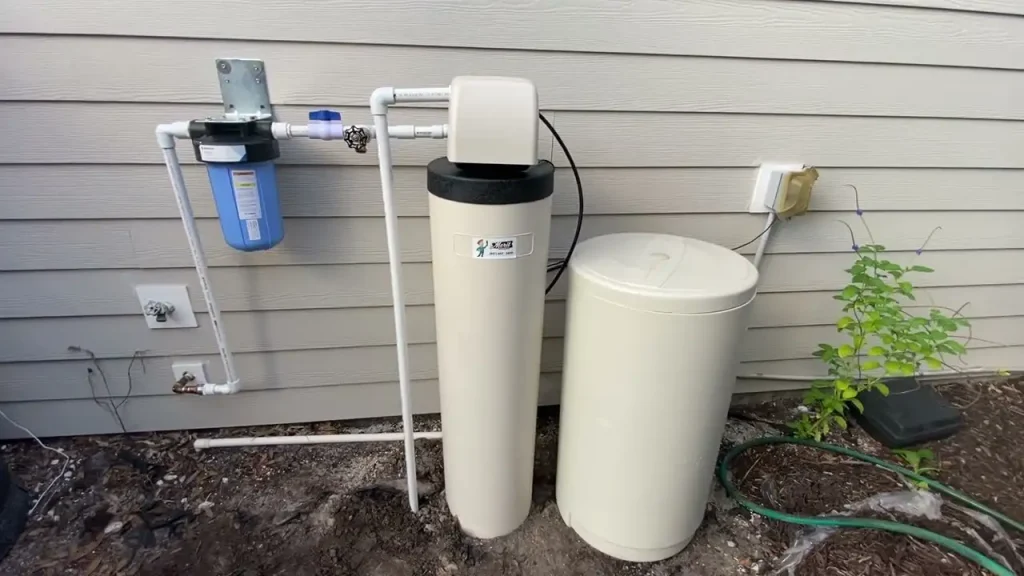
- Mineral tank: holds the resin bed where ion exchange happens.
- Brine tank: stores salt and water that form the regenerating brine.
- Control valve: meters water use, starts regeneration, and manages each cycle stage.
- Bypass valve: routes water around the softener for maintenance or a malfunction.
- Drain line: carries regeneration wastewater away with a code-required air gap.
Reading Your Water Test Before You Buy Anything
Never buy a softener on a guess. A home test strip or a lab kit gives you hardness in grains per gallon, and your municipal water quality report lists it too. If you are on a well, test for iron as well, because iron changes the sizing math: every 1 part per million of iron counts as roughly 4 to 5 extra grains of hardness. A softener can handle small amounts of iron, but heavy iron fouls resin and needs a dedicated iron filter installed ahead of the softener.
Sizing the Softener to Your Household’s Daily Grain Load
Softener capacity is rated in grains — the total hardness a unit can remove before it must regenerate. The standard method is simple arithmetic: multiply the number of people in the household by daily water use per person, multiply that by hardness in gpg, and multiply the result by the number of days you want between regenerations. Plan for roughly 60 to 75 gallons per person per day and aim for regeneration about once a week, which keeps salt use efficient.
| Household | Daily use | Hardness | Daily grain load | 7-day capacity needed |
| 2 people | 150 gallons | 10 gpg | 1,500 grains | About 11,000 grains |
| 4 people | 300 gallons | 10 gpg | 3,000 grains | About 21,000 grains |
| 4 people | 300 gallons | 15 gpg | 4,500 grains | About 32,000 grains |
| 6 people | 450 gallons | 12 gpg | 5,400 grains | About 38,000 grains |
Common residential sizes run from 32,000 to 64,000 grains. Choose a unit whose capacity sits a little above your calculated weekly need rather than far above it: an oversized softener regenerates rarely and can channel water through the resin bed, while an undersized one regenerates constantly and burns through salt. Size by grains, people, and flow — never by how tall the tank looks in a product photo.
Salt-Based, Salt-Free, or Dual-Tank: Which Softener Fits Your Water
Salt-based ion exchange is the only technology that actually removes hardness minerals. So-called salt-free softeners are more accurately called water conditioners: they crystallize hardness minerals so scale forms less readily, but the minerals stay in the water and a hardness test still reads hard. Dual-tank systems use two resin tanks that alternate, so soft water is always available even during regeneration — useful for large households, but more expensive and more complex to maintain.
| System type | Removes hardness | Needs salt and drain | Best for |
| Salt-based ion exchange | Yes, fully | Yes | Most homes with hard water |
| Salt-free conditioner | No, conditions only | No | Light scale concerns, no drain available |
| Dual-tank ion exchange | Yes, fully | Yes | Large households, continuous demand |
| Magnetic or electronic | No proven removal | No | Not recommended as a sole solution |
Tools, Fittings, and the Spot to Put the System
Pick the location before buying the pipe. The softener belongs near the main water entry, close to a drain and a grounded outlet, with the tanks upright, level, and accessible enough to lift 40-pound salt bags into the brine tank. Leave clearance above the control head and space around the tanks for service. Outdoor installation is possible only in a freeze-proof enclosure, since a frozen resin tank can crack.
- Pipe cutter, PEX crimp or copper soldering tools, adjustable wrenches, and Teflon tape.
- Bypass valve, inlet and outlet fittings, drain line tubing, and an air-gap fitting.
- Brine line tubing, hose clamps, a level, and a bucket for pressure testing.
- Hardness test strips for the final check, plus salt and a funnel for the brine tank.
Installing the Softener Step by Step
Work methodically and keep every joint accessible for a leak check at the end. If your local code requires a permit and inspection for a softener install, get it before cutting pipe — many jurisdictions do, and an unpermitted drain connection can cause problems at resale.
Shut off the main water supply and open a nearby faucet to relieve pressure and drain the line.
Set the resin and brine tanks in place, level them, and strap them so they cannot tip.
Fit the bypass valve onto the control head first, then connect the inlet and outlet to the main line.
Cut into the main cold-water line before the water heater and join the softener in line.
Run the drain line to a standpipe, floor drain, or laundry tub with a proper air gap.
Connect the brine line between the brine tank and the control valve, snug and sealed.
Add one to two gallons of water to the brine tank, then fill it with salt to the marked line.
Plug in the control head, program the time, hardness, and capacity, and set regeneration for the early morning.
Open the main valve slowly with the bypass engaged, check every joint, then run a manual regeneration.
The first regeneration takes ninety minutes to two hours. Expect the water to taste slightly different for a day, and wait 24 to 48 hours for the system to stabilize before trusting a hardness strip reading. If a joint weeps, tighten it gently — over-tightening a plastic fitting cracks it, and a cracked fitting leaks worse than a loose one.
Programming the Control Head and Running the First Regeneration
Programming is where most installs quietly fail. Enter your actual tested hardness, not the number on the box or a neighbour’s reading, because the control head calculates regeneration timing from it. Set the time of day correctly so regeneration happens in the early morning when nobody is using water; a cycle that runs during a shower sends salty water to the tap. If the valve offers a demand-initiated mode, use it — it meters real usage instead of guessing.
Start the manual regeneration and watch the drain line during the brine draw stage. You should see a steady flow, then a rinse that runs clear. If the brine tank does not draw down, check the brine line for a kink and confirm the injector is not clogged with sediment. A softener that never regenerates is just an expensive pipe fitting.
Softener Mistakes That Leave Fixtures Scaling Again
- Installing after the water heater, so the heater keeps scaling.
- Skipping the bypass valve, which turns every service job into a plumbing shutdown.
- Running the drain line without an air gap, risking backflow into the softener.
- Sizing from tank height instead of the grain calculation.
- Forgetting the first manual regeneration, so the resin starts uncharged.
Keeping the Brine Tank, Resin, and Drain Line Healthy
Check the salt level monthly and top it up before the brine tank runs dry. Once a year, clean the brine tank: shut the system down, scoop out remaining salt, rinse out the sludge that collects at the bottom, and refill with fresh salt. Resin itself lasts many years, but iron in the water shortens its life — if you have iron, use a resin cleaner periodically and keep the iron filter ahead of the softener maintained.
Test the water at a kitchen tap every few months with a hardness strip. A rising reading means the resin is exhausted, the salt bridge has returned, or the control head lost its settings after a power cut. Most control heads lose their clock in an outage, so re-check the time after any blackout or the regeneration schedule drifts into the middle of the day.
Water Softener Installation FAQs
Can I install a water softener myself?
Yes, if you can cut and join pipes — PEX, copper, or CPVC — and make a code-compliant drain with an air gap. Plan three to six hours for a first install, and call a plumber if your local code requires a permit or if the main line is in an awkward spot.
Does a water softener remove chlorine or sediment?
No. A softener removes calcium and magnesium only. If your water has chlorine taste, sediment, or iron, add a carbon filter, sediment filter, or iron filter in front of the softener as a separate stage.
How much salt does a softener use?
It depends on hardness and household size, but a correctly sized demand-initiated system for a family of four typically uses roughly one 40-pound bag of salt per month. Oversized or timer-based units use noticeably more.
Will softened water taste salty?
Properly regenerated soft water contains only a small amount of sodium — far less than a slice of bread. If the water tastes salty, the system is likely regenerating at the wrong time or the brine rinse is incomplete.
Do I need a drain near the softener?
Yes. Every regeneration sends wastewater to a drain, and code requires an air gap so drain water cannot flow back into the softener. A floor drain, standpipe, or laundry tub all work if the air gap is correct.
How long does a water softener last?
A well-maintained residential softener commonly lasts 10 to 15 years. Resin life depends on water quality — iron and chlorine shorten it — and the control valve is usually the first part to need replacement.
Final Thoughts: Soft Water That Actually Protects Your Plumbing
A water softener earns its keep only when three things are right: the hardness reading is real, the grain capacity matches the household, and the drain and bypass are installed to code. Get those right and the payoff is quiet — fixtures that stay clean, a water heater that runs efficiently, and soap that finally works the way it should. Skip them and you own an expensive tank that regenerates on a schedule nobody checked. Test first, size honestly, and check the salt monthly; the plumbing will take care of itself.